Even though modern routers handle most of the functions automatically, some of the applications will need you to manually forward a port to that application or device. How to Port Forward?
Luckily, it is really simple to do if you know where to look at it.
What is Port Forwarding?
There are a couple of projects which use your computer as a server for other devices.
When you are inside your network, most of the things will work fine. But some apps, if you want to access them when you are outside your network, make things a bit much hairier. Let’s further discuss this matter.
Why do You need to Forward Ports?
So why would you need to forward ports?
While some of the applications take advantage of NAT to set their ports and handle all the configuration for you, there are still many of the applications that do not, you will need to give your router a helping hand when it comes to connecting services and applications.
Know your IP Address (and set a Dynamic DNS Address)
In addition to using static IP assignments for the relevant devices which are inside your network, you also want to be aware of your external IP address – you can find that by just visiting on a website whatismyip.com while on your home network.
Even though you might have the same public IP address for months or even for over a year, your public IP address can change (unless your internet service provider has explicitly have given you a static public-facing IP address).
In other words, you cannot rely on typing in your numeric IP address into whatever remote tool you are using (and you cannot rely on giving that IP address to your friend).
Now, as you could just go through the hassle of manually checking that the IP address each time you leave the house and intend to work away from home (or every time your friend is going to connect to your Minecraft server or alike), that is a big headache, to be honest.
Instead, I highly recommend you set up a Dynamic DNS service that will allow you to link your (changing), home IP address to a memorable address just like mysupergreathomeserver.dynu.net.
Pay Attention to Local Firewalls
By the time you have set up the port forwarding on the router level, there is a possibility that you may want to tweak firewall rules on your computer too.
For example, I have gotten a lot of emails over the years from some of the frustrating patents setting up port forwarding so their kids can play Minecraft with their friends.
In almost every other case, the issue is that despite setting up the port forwarding ptcl rules on the router correctly, somebody ignored the Windows firewall request asking that if it was OK if the Java platform (which runs Minecraft) could access the greater internet. More visit: AmazeInvent
You have to be aware that on computers running a local firewall and/or anti-virus software which includes firewall protection, you will most likely need to confirm the connection which you have set up is okay or not.
Step One: Locate the Port Forwarding Rules on Your Router
Are you exhausted by all the networking lessons? Do not worry, it is finally time to set it up and now that you know some of the basics, it is much easier.
As much as I would love to provide exact instructions for your exact router, the reality is that every router manufacturer has their unique software, and how that software looks can even differentiate between the router models.
Rather than attempting to capture every variation, I will highlight a few things to give you an idea of what the menu looks like and I will encourage you to look up the manual or online help files for your particular router to find the specifics.
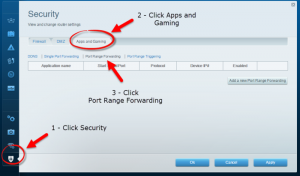
Generally speaking, you are going to be looking for something which is called “Port Forwarding”.
You may have to look through various types of categories to find it, but if your router is any good, then it should be there.
Just to give you an example, there is a difference between a D-Link router port forwarding software menu and on the same router which is running the popular third party DD-WRT firmware, the port forwarding settings look different.
As there is a difference between the two and it is a huge difference, even on the same hardware.
In addition to that, the location is also completely different within the menus.
As such it is most useful if you look up the exact instructions for your device using the manual or by using a search query.
When you have located the menu, it is then time to set up the actual rule.
Step Two: Create a Port Forwarding Rule
After studying all about the port forwarding, setting up a dynamic DNS for your home IP address, and all of the other work which went into this, this is the important step which is called creating the actual rule. It is pretty much a walk in the park.
Despite the differences in the location on a different router software, the general input is the same. It is almost universally, you will name the port forwarding not working.
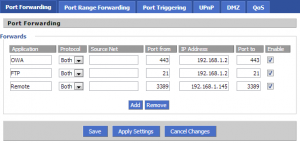
Some of the router firmware, including the advanced DD-WRT, will allow you to specify a “source value which is a list of IP address you’re restricting the port forward to for security purposes.
Now, you will need to put it in the external port.
This is the port that will be open on the router and facing the internet.
You can use any number which you want here between 1 and 65353, but practically most of the lower have taken up by standard services like email and web servers and many of the higher numbers are assigned to common applications.
Finally, put in the internal IP address of the device, the port you on that device, and (if it’s applicable) toggle the rule on. Do not forget to save the settings. Official web: here


