


How To Add a Camera to Obs?
Adding a Camera to OBS Studios Easy to plug into your camera with the above process, here is where you will add the camera.
OBS stands for Open Broadcaster Software, but most commonly it is known and called OBS only. This software is designed to provide you with the services to stream live or prerecord videos on social media platforms.
There are many ways through which you can directly go live on so many social media platforms and this might give birth to many questions in your mind that when you can go live directly, what is the use of OBS services then?
Open Broadcaster Software (OBS) has many advantages for you which you will not avail in going live directly, such as this OBS provides you with the facility of streaming your pre-recorded videos as if those videos are live and additionally it lets you display various scenes which can have changed during you are streaming live.

If you have never used Open Broadcaster Software (OBS) before, then I will now tell you about what an OBS does for you.
Features of Open Broadcaster Software (OBS)

- OBS is designed and used for the live streaming purpose and real-time audio and video mixing purpose
- With the usage of OBS, you the capability of mixing audio with the intuitive audio mixer, and it also provides you with the choice of per-source filters. These per-source filters contain noise gate, noise suspension, and gain
- OBS services allow you to add screen recording in between your media videos or as a part of your media video by providing you with a small individual space on the same screen.
- OBS lets you pause any time in between your live session and while you have paused your stream, it will show a pre-selected banner of your choice which you will choose for it to show to the audience while you are away.
- More about OBS is that the OBS allows you to share your screen and display screen recording to the people who are watching your stream while you are living with your streaming session.
When it comes to streaming, not every streamer is happy with just adding a game to OBS and simply record or stream your gameplay.
Many streamers want to share their smiling face on camera and engage the audience with their visual presence.
Procedure to Add Camera to your OBS
OBS Studio supports and runs a wide range of camera types. If you have anything added to your computers like a camera or something, it will automatically be visible to you from the drop-down window of the DEVICE area.
That is why if you haven’t yet set up a camera or a webcam, this is the first thing you should do.
Connect the webcam or any other camera you want to add with OBS to your PC or Mac.

Then, you have to run the Open Broadcasting Software (OBS).

It will appear within the All Apps area which can have accessed by pressing the start menu button on your keyboard or your screen.

For the users of MAC, you will find this OBS application in the folder named “Applications”.

The next thing you need to do is to click the option which shows a “+” sign. This Application folder is the first icon under the option “Sources.” When you will click the option with a “+” sign, a menu will appear before you.
You will see a lot of options, such as Audio Input Capture, Audio Output Capture, Browser Source, Game Capture, Media Source, Screen, “Video Capture Device”, etc.
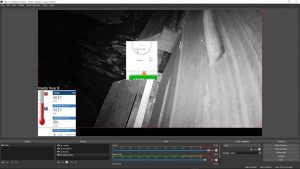
You need to select and click the “Video Capture Device.” After you click it, you will see another window saying, “Create/Select Source.”
In this “Create/Select Source” window, it will ask you to type a name for the camera you are using. You have to type that name in the box which says “Create New”. After setting the name of that camera, click the OK option. The Properties menu will appear on your screen.

In this drop-down menu, you will have to select your webcam or camera from the very first option on this properties menu which says, “Device”.
Have a look at all the settings you did, and then confirm that the camera or webcam you have set up for OBS is selected by the OBS Studio.
And then just click the “OK” option. Hence, your webcam or any other camera you wanted to set up will be successfully added to the OBS Studio.
I want to tell you another thing which might help you in the future someday or somewhere. If you ever think that you need to deactivate or activate your camera, you are provided with a button on the screen for this purpose only.
This feature is very beneficial for all the people who use their camera for other purposes as well, such as if you need to deactivate the camera from OBS software to enable the camera for software that is running in the background.
Otherwise, follow to a more help guide: here
I hope that all the steps and procedures I have disclosed for you in this article should be helpful to you so that you can easily add a camera for your game streaming purpose.
What’s the difference between a virtual camera and a digital camera?
The main difference is that digital cameras do not have film but they use memory cards instead, while film cameras have light-sensitive part film, digital cameras have CCD / CMOS sensors which light Captures and transforms. A picture.
Can OBS flow across multiple platforms?
The active member is not itself within an instance of OBS without additional methods or platforms.
RestreamU-U will let you navigate to multiple platforms with one example from OBS. You can install NGINX with the RTMP module and configure it to send streams across multiple platforms.
Can I use an IP camera as a webcam?
- Launch the webcam program you want to use with the virtual webcam.
- Click the “File” tab and select the “Preferences” option, then select the “Camera Source” option.
- With the changes, the IP camera will now use as a virtual webcam for recording or live streaming webcam programs.
How can I use my DSLR as a camera?
After downloading the software, install it, and connect your Canon DSLR to it using a USB cable.
The software will detect the DSLR automatically and you do not have to do anything manually. Now go to Skype and select EOS Webcam Utility Beta in CSS to start using your DSLR as a camera.