This article is going to teach you how to get administrator privileges on Windows 10. This article covers about 4 steps to get administrator access on Windows 10.
To grant your account administrator access, you have to log in to the PC with an existing administrator account. There are basically 2 ways to achieve this, number 1, log in with the built in administrator account.
Number 2, if you do not have the password for the local administrator account, ask another person with administrator access on the PC to grant you admin permissions on that PC.
How to get Administrator Privileges On Windows 10 by Windows Settings?
The fast and quickest method to grant your account administrator permissions on a Windows 10 PC is by Accounts Settings. Here are some of the detailed steps:
- Right-click on the Windows 10 Start menu and then click on Settings.
- Then on the Windows Settings screen, click on Accounts.
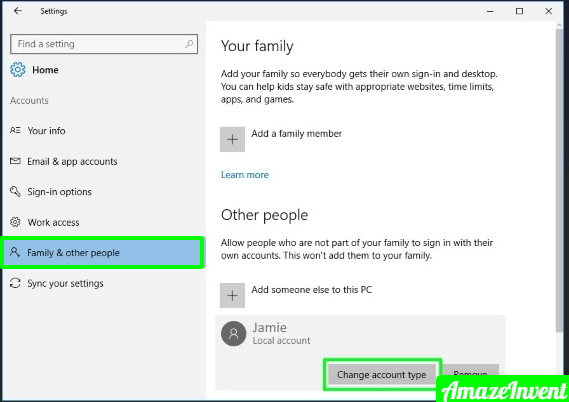
- On the left pane of YOUR INFO screen, click on Family & other users.
- When the Family & other users screen opens, on the ‘Other users’ section, then click on the account to which you want to grant admin access. The account will then expand and display some of the additional options as well.
- After that, from the displayed account options, click on ‘Change account type’.
- Then, on the ‘Change account type’ pop up window, click on the ‘Account type’ drop-down menu, and then select Administrators.
- Now to save your changes, on the bottom right of the ‘Change account type’ pop-up window, click on OK.
- Then you will be returned to the ‘Family & other users’ screen. The user will now be identified as an ADMINISTRATOR.
How to Get Admin Access on Windows 10 by using Command Prompt?
For the Windows admin which prefers that command prompt over GUI, this section is just for you.
- Type on command prompt or cmd in the search box. Then from the search results, right-click on the Command Prompt and then select Run as administrator.
- You will then receive a User Account Control confirmation screen which will ask you to allow the program to make changes to your computer, click on Yes.
- On Command Prompt, to list all of the users on the PC, type the command given below and then press enter.
Net user
- Then copy the username for the user which you want to grant the admin access to.
- Finally, to grant the admin access on Windows 10 to the user, simply type the command below and then press enter.
Net localgroup Administrators UserName /add
Replace your UserName with the username for the user which you want to add to the administrators’ group.
In this example, let’s suppose if I add the user, NewLocalUser to the local administrators’ group. here is the modified command.
Net localgroup Administrators NewLocalUser /add
- If the command returns “The command completed successfully”, then you have successfully granted the user admin access and privileges.
- To remove the admin access, type the command given below and then press enter.
Net localgroup Administrator NewLocalUser /Delete
- If the command will return as “The command completed successfully”, then the user’s admin access has been canceled.
Read the whole article to get the admin access and privilege in Windows 10. As you can see by reading this article, it is very easy to get admin access on Windows 10.
I hope that you have found this article helpful and you will now be able to use or gain admin access on Windows 10.
Read more: How to Use Powerwash Chrome?
You may get more information: here


