
Particularly this question of how to perform a screenshot on a Mac device is one of the most obvious questions to ask.
In this article of mine, I will be providing you with some methods you can apply to take screenshots on your Mac device.
But before that, as for all the guys who are new to Mac devices, I am thinking of giving an overview of Mac itself first.

About Mac

The first-ever versions had no name in the initial stage but then they happen to be known as Macintosh System Software in the year 1988.
After 9 years, with the release of Mac OS 7.6, it was called Mac OS in the year 1997, and then it was retrospectively known as Classic Mac OS.
The current version that we guys are using now is macOS Catalina, this version was released on7th of October 2019. And you guys should know that all the Intel-based Mac devices are designed with the ability to run native third-party operating systems such as Linux OS, OpenBSD, and Microsoft Windows as well.
This was only some basic knowledge about Mac, and there are a lot of things to love about these Mac devices, but the lack of Print Screen key is one to mourn about to be very honest.
Without that Print Screen key, people think it is nearly impossible to take a screenshot on MacBook air, right? Do you guys think the same?
If you guys work in a certain manner that it is a requirement that you need to take regular screenshots of your MacBook or Mac Pro, what will you do then? Well, there is no need to worry about anything like this now because I have got you covered.
Stick around this article and keep reading it to the end so I will walk you through the procedure of how to take a screenshot on a Mac computer and then work with them after capturing them.
All the Apple device users know that Apple has provided a fair number of options that let you easily save, delete, and open the screenshot for many other purposes.
There are multiple ways to get the screenshot you need, from applying some keyboard commands to some applications that are compatible with macOS. So, without any further wait, let’s start with the methods now.
Methods of Taking Screenshot on Mac
Using Keyboard Commands In Mac

Using keyboard commands for macOS is the easiest, convenient and quickest way to take a screenshot using a mac with a windows keyboard, whether you want to capture the entire screen of your Mac device or just a little particular portion of it, there are particular keyboard commands which can be applied.
- By default functioning, the methods of Apple save your screenshot to the desktop.
- Though, if you just simply want to copy the screenshot you took to the clipboard, I will provide you a keyboard shortcut for that as well.
Capture the Entire Screen of your Mac Device
Procedure #1:
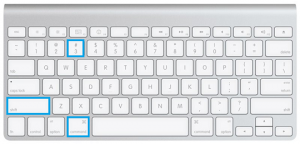
You will have to press 3 buttons: Command + Shift + 3 at the same time to take an instant screenshot to your desktop.

Procedure #2:
- You will have to press 4 buttons: Command + Shift + 3 + Control keys at the same time to take a screenshot on mac without the keyboard of your screen and save it directly to your clipboard.

In this latest version of the operating system which is known as MacOS Catalina, a screenshot preview will appear in the corner of your Mac device screen, and this preview will provide you with quick access to some editing tools.
- In addition to this, you can also take great advantage of the feature called “Stacks”,.
- This feature groups together all the similar files on your desktop, for example, your screenshots.
- To do this, you will just have to right-click while you are on your desktop.
- Then select “Use Stacks” on the menu that has appeared on the screen to toss them all up into a group.
Capture a Particular Area of Your Screen
Procedure #1:
- You will have to press 3 buttons: Command + Shift + 4 keys at the same time.

- This will turn your mouse pointer into a crosshair, and with that crosshair, you will have to click and then drag to select the particular area that you want to capture your screen.
- When you will let go of the mouse button, the screenshot of that particular area will be saved to your desktop.
Procedure #2:
You will have to press 4 buttons: Command + Shift + 4 + Control keys at the same time. This will turn your pointer into a crosshair; you will have to click and drag to select the particular area of your screen that you want to capture.

And when you will let go of the mouse button, the screenshot of that selected area will be saved to the clipboard.
Capture a Screenshot of Single Window
Procedure #1:
- STEP 1: You will have to press Command + Shift + 4 keys at the same time. This will turn your pointer into a crosshair.

- STEP 2: Then you will have to press the Spacebar. This will turn your pointer into a camera icon.

- STEP 3: Any window you will hover over with your mouse will be highlighted in Blue. You will have to click on the window to capture the screenshot, and that image will be saved to your desktop.
This procedure not only captures windows but also you can save the desktop, the menu bar, the Dock, and even an open menu by itself as well.
The image that is saved by this feature consists of the window and its shadow against a transparent background (PNG).
- And if you guys don’t want the shadow there, you will just have to press and hold the Option key or Alt key as you click to save that screenshot image of yours that you captured.
Procedure #2:
Procedure number two is the same as procedure number one that I have mentioned just above this procedure.
- The only difference is that you will have to press 4 buttons here in the starting: Command + Shift + 4 + Control keys at the same time. And then follow the remaining steps the same to save the image into your clipboard.
Using the On-Screen Marquee
If you guys are using Mac operating system Mojave or any version that is released later than this, then you can load an on-screen marquee that you can move or resize according to your needs.
This on-screen marquee provides you with three tools that are used for capturing screenshots.
- It provides all the users with options for saving, whether to show the pointer or not and many others as well.
Procedure #1:
- You will have to press 3 buttons: Command + Shift + 5 keys at the same time to select and choose your target shot, such as if you want to capture a full screen, a specific window only, or a particular portion of your screen.

- And then save the resulting image into your desktop or any other location that you want. AmazeInvent
Procedure #2:
- You will have to press 4 buttons: Command + Shift+ 5 + Control keys at the same time to select and choose your target shot, whether you want to capture full screen, a specific window only, or a particular portion of your screen.
- And then save the resulting image directly into the clipboard for further usage.

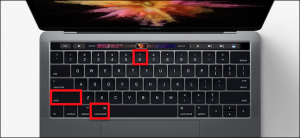
- For all the people who are using a Macbook Pro with Touch Bar, you guys will have options like Selected Portion, Window, or Entire Screen.
You can use these options to save your screenshot to any folder as well, such as on Desktop, Documents, or in the Clipboard as well.
Official support for you: here
Where can I find my screenshots on Mac?
The Mac OS X screenshot utility is a system that automatically saves your screenshots when you press a few keyboard shortcuts.
By default they are stored on your desktop, and using a terminal cannot change the reduction.
Can you screenshot on Mac?
- To take a screenshot, press and hold these three keys together: Shift, Command, and 3.
- If you see a thumbnail in the corner of your screen.
- Click it to edit the screenshot.
- Or wait for a screenshot to be saved on your desktop.
Where’s the clipboard on Mac?
You can see it on the clipboard through the Finder menu in the upper toolbar.
Show the clipboard to view the previous item and select the one you copied.
How do you screenshot Netflix on Mac?
- If you’re using a Mac, here’s a “Netflix screenshot hack“: just hold down Command + Shift + 4.
- After which the cursor will turn into a selection tool.
- Drag straight to the area where you want to take the screenshot, then release.
How do I access my screenshots?
The files are stored in the Pictures / Screenshot folder (or DCIM / Screenshot).
Depending on your Android version, you can find an album with screenshots in the Photos app. Open the Photos app, go to Albums, and screenshots to view the album.
There you are going to find all your screenshots.
Why can’t I see my screenshots on Mac?
- Open Finder and click “All My Files“, then change the file creation date as it was set.
- Any new screenshots should be shown at the very beginning.
- You can use the spotlight to find the “screenshot“.
- If that still doesn’t work, check your keyboard shortcut settings to make sure it hasn’t been changed.