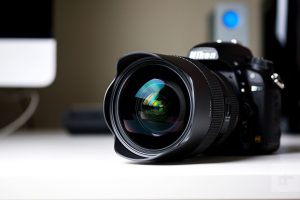
29 Amazing Tips of Point-And-Shoot of Camera
Consumers are always looking for time-saving shortcuts, and their attention is naturally drawn to the fastest way to gather information: images and point-and-shoot of camera.
Product images not only testify to the quality of your product but also serve as windows in your e-commerce store, creating two very important things.
- Transparency
2. Trust
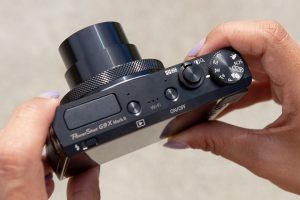
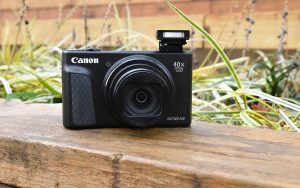
Non-experts generally utilize it since it is anything but difficult to use and arrives in an easy to use a smaller size.
Simple to use cameras ended up well known in the late 1980s and are by a long shot the top of the line independent cameras available.
Simple to use can allude to either camera that utilization film or too advanced cameras. The focal points are typically center free, having stationary gaps.
Models of such cameras with a glimmer have no control over the introduction of the blaze because of the fixed opening size.
Be that as it may, some more up to date models do give the client some authority over gap and introduction. Simple to use camera deals started to decay after the presentation of HD cameras in cell phones in 2010.
29 Amazing Tips of Point-And-Shoot of Camera
Simple to use cameras are a lot less challenging to work and more reduced than single-focal point reflex (SLR) cameras.
However, don’t give picture takers as much power over the last picture, which is the reason experts, for the most part, incline toward SLR cameras.
Simple to use cameras get a terrible wrap from confident picture takers because of their constrained highlights. AmazeInvent
Benefit From The Point And Shoot Camera
In any case, as the well-known adage goes, the best camera is the one you have with you, so if a simple to use is the thing that you have, you best figure out how to benefit as much as possible from it!
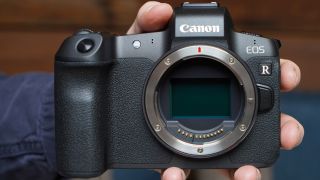
Without a doubt, the capacities and goals from a simple to use can’t coordinate any semblance of a Nikon D850. However, that doesn’t imply that you can’t get proficient quality photographs with somewhat across the board rig.
Low dynamic range
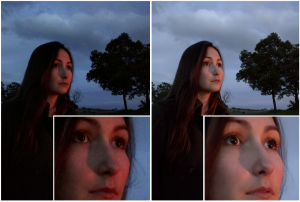
The most evident approach to the battle low powerful range is by utilizing light.
If you are shooting a substantial difference circumstance these are past your camera’s cutoff points, including fill light is a reasonable method to get the presentation inside a couple of stops.
You don’t have to approach the most costly lighting unit available; you can get phenomenal outcomes by utilizing the most essential of rigging.
Look at SLR Lounge’s Lighting 101 and 201 to learn systems and how to use the hardware you as of now have.
With the end goal of this article, I will concentrate on the most proficient method to accomplish fantastic outcomes without utilizing an external light source.
Blow the Highlights
In high complexity shooting circumstances, probably the best choice is uncovering your subject (or even skin tones), making the features victory.
My general comprehension of this is that you would prefer not to battle the way that your camera has low DR. It is essential to practice for shooters to locate a center ground.
The presentation is to crush a tad of dynamic range from their sensors. In all actuality, they ought to uncover for the shadows or features.
Outlines

Outlines are the precise inverse to the past point. Rather than uncovering for your subject or model in a high complexity circumstance, you should take a stab at revealing for your features instead and let your question fall into the outline.
Doing so can be a decent method paying little mind to the camera. However, it is particularly viable for low DR cameras.
Frameworks can make a beautiful state of mind that adjusts the vibe of some random casing.
This isn’t for each subject you most likely would prefer not to shoot design this way, yet on the off chance that your scene requires a progressively emotional touch, this does some incredible things.
You are utilizing all unique range to catch the features and permitting your shadows to clasp to dark.
Reflectors

The initial two choices are significant decisions on the off chance that you are happy to allow you to expose to fall into the shadows or blow your features, however, imagine a scenario where your scene calls for something more.
Consider the possibility that you have to show both the skin tones and the subtleties of your experience, yet your camera is constraining you to pick either.
The conspicuous answer is to utilize some light to fill in those shadows. Without using off-camera streak, you can outfit the intensity of the Sun with a straightforward 5-in-1 reflector.
Slow Autofocus

Sony’s new α6400 is furnishing with a 24.2 MP3 APS-C measured picture sensor this is matched with an overhauled BIONZ X processor to convey unfathomable headways in the picture quality and shading generation in a wide range of shooting conditions.
Standard ISO ranges up to ISO 32000 for both still and the motion pictures and is expandable up to ISO 102400 for still photographs, with fantastic commotion decreased at medium and high sensitivities.
The camera additionally acquires a large number of the picture preparing calculations from Sony’s freshest full-outline cameras, enormously smothering clamor while protecting goals and improving surface delineation.
Propelled High-Resolution
The flexible α6400 is an uncommon camcorder, offering inside 4K (QFHD: 3840 x 2160) film recording with full pixel readout and no pixel binning to gather about 2.4x.
The measure of information required for 4K motion pictures, and afterward oversamples it to create an excellent 4K film.
An outstanding point of interest and profundity. Centering during motion picture shooting is quick and stable gratitude to overhauled Fast Hybrid AF innovation, which keeps the subject inconsistent smooth concentrate regardless of the scene, and regardless of whether an item crosses before the camera.
It progressed AF in addition to contact center usefulness settle on it a perfect camera decision for some vloggers and video makers that are consistently making and transferring content on the web.
For time-slip by motion picture creation, the new camera highlights worked in the interim account that can have set anyplace somewhere in the range of 1 and 60 seconds, with a complete number of shots from 1 to 9999.
AE following affectability can have acclimated to “High”, “Mid” or “Low” during interim shooting, taking into consideration decreased changes in introduction over the shooting interim.
Furthermore, without precedent for Sony APS-C mirrorless camera, the new model incorporates an HLG (Hybrid Log-Gamma) picture profile.
It supports an Instant HDR work process, permitting HDR (HLG) perfect TV to playback excellent, consistent with life 4K HDR symbolism.
Further, both S-Log2 and S-Log3 are accessible for expanded shading evaluating adaptability, just as Zebra usefulness, Gamma Display help, and intermediary recording.
The camera can likewise record Full HD at 120 fps at up to 100 Mbps, enabling the film to be checked on and in the long run, altered into 4x or 5x moderate movement video documents in Full HD goals with AF following.
Poor Manual Controls
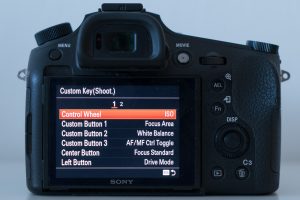
To open the genuine capability of your simple to use the camera, it’s critical to see how to shoot utilizing the camera’s manual settings.
Shooting in manual gives you absolute command over how your pictures are uncovering.
While it may take some becoming accustomed to, the opportunity to catch photos of how you see them will make for an all the more remunerating photographic experience.
There are three interconnected settings to think about when shooting in manual on a simple to use the advanced camera: screen speed, ISO, and gap.
Understanding these settings and figuring out how to adjust them is the way of creating appropriately uncovered photos. The best simple to use computerized cameras has simple to-utilize manual controls.
Still, since each camera is extraordinary, you ought to counsel your manual to discover which catches modify what.
Manual Controls
Shade speed is most likely the simplest of these settings to get it. It is the measure of time that the screen is open, presenting the sensor to the picture that you wish to catch.
At the point when the shade is open for more extended periods, all the more light gets to the sensor for more brilliant photos. If you leave it open for a long time, be that as it may, you can keep running into a few issues.
Right off the bat, leaving the screen open for a long time can prompt overexposed photos. On a splendid day, a quick screen speed is essential to protect that the sensor isn’t available to an excessive amount of light.
Besides, any development while the shade is open can prompt obscuring in your photos. To limit movement obscure, it’s a smart thought to shoot with as quick of a shade speed as the light will permit.
Large depth of field
There are two depths of areas.
Shallow depth of field

The shallow profundity of field is difficult to accomplish with most point-and-goes for most shots since their sensors and focal point axial lengths will, in general, belittle. There are a few exemptions, however, in light of a quick focal point and film or more exceptional sensor.
In any case, if the simple to use has excellent scalability (for example, can concentrate extremely close) or has some approach to append a nearby focal point. A shot concentrated exceptionally close (a large scale shot) will have very shallow profundity of-field.
For static or semi-static scenes, you could likewise utilize the Brenizer strategy for shooting numerous pictures at a more extended central length and sewing them into a display.
The profound wisdom of the field

On account of the more extended primary range, it would bring about a shallower profundity of field than taking a similar picture at the more extensive edge.
Since profound profundity of field can have accomplished basically by centering to boundlessness, there are not any cameras that can’t show it.
Indeed, even fixed-center point-and-shoots are focused on the goal that limitlessness is sensibly in the center.
Raw/Manual controls
There point and shoot camera’s don’t capture direct fresh images, so you have to set manual controls
If you might want to have more authority over your photography procedure, you should put resources into a camera that offers manual controls and additionally RAW picture support.
Manual controls imply that you can modify the settings of the camera, and explicitly shade speed, opening and ISO yourself.
Crude is a document group and depicts how the camera spares the picture information. RAW is an uncompressed unaltered adaptation of the more typical JPG or JPEG record design.
Be that as it may, dissimilar to JPG or JPEG records, which can have to utilize, mutual, or printed legitimately, RAW documents can’t be avail straightforwardly.
They should be opened through a program and altered in a product program like Lightroom to make a good picture.
On the off chance that you don’t see yourself doing both of these highlights, and need a simple to use the camera that thoroughly takes care of you and produces excellent pictures, these are probably not going to highlight you should stress over paying extra to get.
Notwithstanding, on the off chance that you feel that later on, you may need more authority over your photography, you may put resources into a camera with these highlights, however, you can set the camera in Auto mode and use JPG or JPEG pictures until that time.
Horrible performance at high ISOs
Don’t shoot when it’s dim. On the off chance that you need to, do it like this: before going out and shooting, test your camera at home.
Set the ISO from 100 right to the most exceptional ISO accessible. Pick the most noteworthy one that you discover still satisfactory as the most elevated you’ll ever utilize.
Choose a Creative Subject
Creative subjects don’t consistently mean it’s an individual grinning before a camera. A theme will be something that will be of intrigue.
It tends to be a pet on lying on the ground, your child merely getting a toy, or only an individual running around the square.
Tip 1:
You can pick somebody who is moping or crying or only a face that gives you an extremely extraordinary look.
Tip 2:
If the individual or thing of intrigue is there is a decent foundation, make a go of the foundation too.
Tip 3:
In taking a representation, don’t simply snap a photo head-on. Snap a photo of somebody from the side or semi-side view. You can even take an illustration of an individual from above; it makes profundity and fantasy.
Tip 4:
Try not to snap a photo with a glimmer; you may wind up with an image of level quality where shadows are going as a result of the blaze.
Learn How to Use It
If your mom wants to take photographs, however, she has no clue how to function her camera. That implies that she misses half of what she needs to photo since she’s always battling to make sense of what the heck she needs to do to take said photos.
As referenced before, simple to use cameras can’t contend with professional style DSLR or mirror fewer cameras.
However, a camera is a camera, and if you see how to utilize it, you can get a sharp photograph. That implies perusing the proprietor’s manual and investing some energy plunking down with your camera and realizing what each catch, dial, and menu work does.
Position Your Frame Properly
In photography, don’t generally imagine that placing the subject in the image is fascinating. It truly isn’t; it’s a commonplace and very buzzword.
This is the reason surrounding makes intrigue. It draws the consideration of the watcher to where it should be. When snapping a photo, incorporate either the whole foundation or a tad of it.
Tip 1:
Never cut an image of an individual on the midriff or the knees. It’s in every case better to snap a photo either on close-up or a more extensive view.
On close-up go just to the extent an individual’s shoulders and additionally upper arm; if not, snap a photo of the whole individual from head to foot.
Keep in mind that pictures cut on the abdomen or the knees can crush the nature of a photograph. Snapping a photo of the whole thing gives a feeling of culmination and congruity.
Tip 2:
Cut your edge on the midriff when taking a famous picture. It is the ideal approach to introduce a systematic view.
Locate a Unique Perspective
Utilizing a little, lightweight camera implies that you’re somewhat more versatile than you would be with a significant full edge DSLR.
Given that additional portability; you have no reason for proceeding to take similar old photographs from the same old viewpoint.
Instead, give your photographs somewhat more life by taking them from the point of view these are from above or beneath an ordinary eye level.
Bow down or rests on the ground to snap a worm’s eye perspective regarding the matter. At that point, get up higher than what you’d ordinarily see a subject from and catch a 10,000-foot view shot too.
By modifying the point of view from which you shoot, you can control how the subject looks, causing it to appear to be more prominent in the casing from a lower viewpoint and causing it to appear to be littler in the edge from a higher perspective.
Read more: Top 15 Social Media Platform Everyone Must Know About it
With that, you have four straightforward yet compelling tips for capitalizing on your simple to use a camera!
Some simple to use cameras even have self-loader shooting modes like gap need or screen need. Others also have full manual controls.
If this is the situation, utilize these settings to further your potential benefit, so you show signs of improvement uncovered.
As it were, don’t just depend on the camera to take the necessary steps for you in programmed mode.
By figuring out how you can expect authority over certain parts of what the camera does, you’ll have the option to make much better photographs in increasingly shifted shooting conditions.
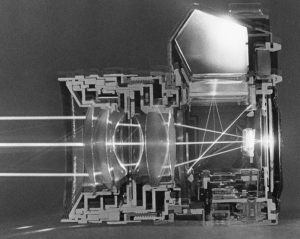
Center is Spot
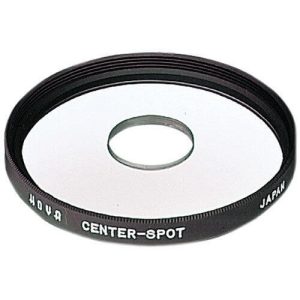
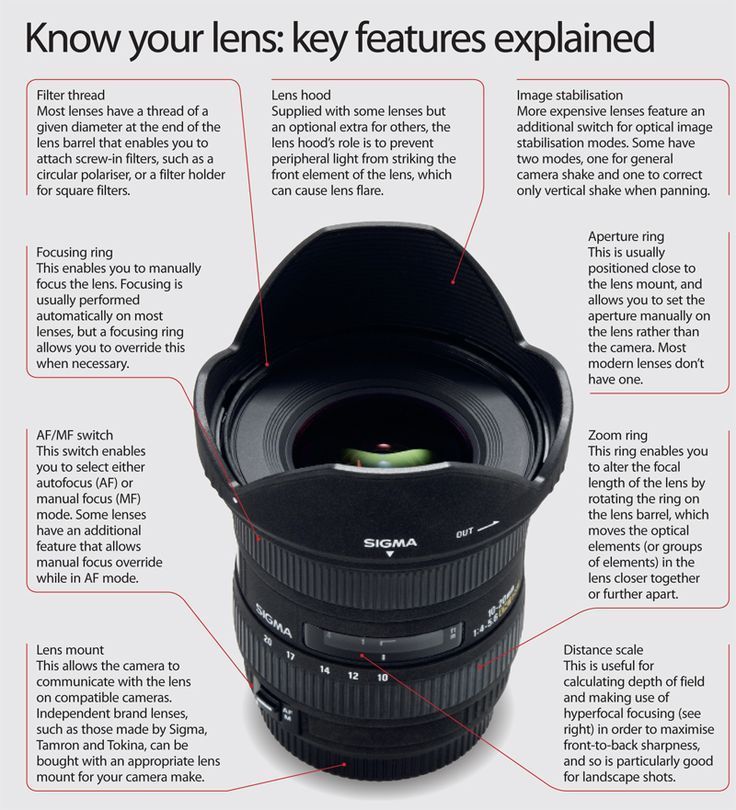
The camera is a light-tight box that has utilized to uncover a photosensitive surface (film or digital sensor) to light. To center the view onto the surface, most cameras (and your own eyes) utilize a focal point to coordinate the light.
For what reason did I say, “Most?” Well, there are numerous kinds of cameras around that don’t depend on focal points to concentrate light.
The “pinhole camera” is a container with a small opening toward one side and a photosensitive surface on the other. Light gets through the little opening and is anticipating the back mass of the container.
An inquiry of the Internet or your nearby library will uncover that researchers and designers are dealing with creating focal points fewer cameras that are never out of the center.
You should maintain a strategic distance from the disastrous attributes granted to light when it goes through glass or plastic focal points. For now, notwithstanding, almost we all are utilizing cameras that concentrate light through a perspective.
How Center Functions
A focal point is an optical gadget that comprises of a bent material that enables light to go through it. It’s contingent upon the structure, a camera focal point, either incorporated with the camera or connected and compatible.
It comprises at least one component that both separates and joins light to center it onto the photosensitive surface and re-amass the light reflecting from the scene that has gone through the optics, bringing about a picture.
You may see focal point particulars on the B&H Photo site that notice “components” and “gatherings.” Each bit of glass is a component, furthermore, at least one component is assigning into bunches inside the camera.
What is this impact?
An out-of-center picture is in the making. The tip of that eyelash is imitating as a fluffy gathering of reflected light that will take after a foggy eyelash tip.
Presently, envision that an unbounded number of times from each purpose of light or appearance in a scene. Foggy!
Zoom in, the Darker Your Image Will Be
The more you zoom your focal point is, the more light your camera will require. Your camera will, at that point take measures to make up for the murkiness.
However, it can stain the picture quality a piece. To get the best photographs, attempt to get straight very close to your subject.
It isn’t always legitimate or suitable, yet it’s great to remember. Likewise, know the distinction between digital and optical zoom.
At the point when you’re zooming in, a little meter comes up on your camera’s LCD screen. At the point when it hits a specific line, you’ll hear that the focal point isn’t zooming any longer.
Now, your camera is merely amplifying a particular bit of the picture. Advanced zoom can have its uses. However, all in all, it isn’t prescribed.
Your Camera Has Scene Settings
A portion of these scenes was examining above, yet others may incorporate seashore, pets, parties, nourishment, view, and so on.
They improve the camera for various circumstances, for example, sports shooting or the lowlight situations during evening time shooting.
Before you snap a photo, you may need to rapidly change your camera’s setting to one of these, to guarantee that it upgrades itself for better pictures.
Makers incorporate these settings to make photography as straightforward as workable for you.
Cause The Most of What You to have
Taking your camera when setting off to seashore or going to a birthday gathering is the primary use for your model. Incredible shots can have taken whenever and anyplace.
Put your camera in your camera consistently. If what you have are the run of the mill, simple to use modes like programmed modes, for example, scene, representation, night mode, and so on using them! Give things a shot with what works best to set you up for manual mode.
Tip:
It’s pleasant to take photographs where your subject is featured, and their experience is obscured. You can utilize the night mode to make such a shot.
Night mode can likewise be used if you need to make profundity in your photos, night mode is best utilized in lowlight circumstances, yet it can also have utilized to make your experience obscure.
Explore your Body’s Flexibility
With lesser channels and lesser methods for controlling your camera’s settings, utilize your body as a camera stunt. Don’t merely go for a shot where your subject is directly before you.
Bow if you should: to improve see starting from the earliest stage. Remain on a seat on the off chance that you should you can get incredibly amazing headshots. Go behind a hedge on the off chance that you should make a natural edge.
Examination on a Certain Style of Taking Photographs
Try not to go for high bore styles that your camera can’t deal with. Forms like HDR photography, Infrared, all-encompassing shots, or submerged shots (except if your camera is waterproof and weight verification) are past your cameras gauge.
Shoot necessary shading shots and highly contrasting and even attempt scene shots and representation with your run of the computerized mill camera.
The setting is the Key
Fix your settings to fit the circumstance you are in. Now and then, great photography isn’t just about a decent camera; it’s likewise about a suitable area.
Ending up on a slope with the perspective on a mountain loaded up with houses can be a proper subject for your photos. Set your regular computerized camera on scene mode and start taking pictures.
On the off chance that scene mode doesn’t work, attempt night mode. Attempt various methods and play around your settings to catch the scene.
Scenes are perhaps the best picture styles that you can get. Try not to stop for a second on snapping a photo with only your simple to use, snap a photo of a gazebo in the schoolyard.
Snap a picture of the eatery loaded up with cafes or an unfilled cafe promptly toward the beginning of the day.
Light the Path
Lighting is one of the variables that give life and profundity to a photograph. Faintly bright spots are places where your camera is very restricted.
The path for a decent shot is by finding the correct lighting for your shot. Work with the accessible light. On the off chance that you ended up in a spot where the leading available light is a lampshade, then that would make a decent vintage shot.
Tip: Continuously snap a photo against the light. On the off chance that you happen to be inside the house with the window behind your subject, turn the blaze on and snap a photo.
Take Your Flash off the Menu
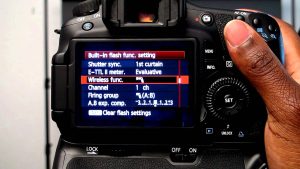
You should give close consideration to the situation of your blaze. If your glimmer is near your focal points or right over your focal points, attempt to diminish your utilization of the fire.
Snapping a photo with the blaze on would evacuate the shadows of your subject, making a level dead picture.
You may diminish your blaze a little by putting a semi-clear organizer over the glimmer or even a slight bit of tissue. It will reduce the quality of the light, making the image increasingly sensible.
Help Your Camera Out
No camera can do it for you, so you have to comprehend what kind of constraints you’re working with your simple to use. For instance, on-camera flashes will, in general, discharge exceptionally brilliant, cruel light that washes out the subject.
It is valid for excellent quality DSLRs and simple to use cameras also. That being the situation, do what you can to abstain from utilizing your camera’s glimmer no matter what.
Utilize natural lighting, turn on each light in the house in case you’re shooting inside, utilize a reflector to ricochet fire onto the subject, etc.
Some simple to use cameras even have self-loader shooting modes like opening need or screen need. Others also have full manual controls.
Don’t just depend on the camera to take every necessary step for you in programmed mode.
By figuring out how you can expect authority over certain parts of what the camera does, you’ll have the option to make much better photographs in progressively fluctuated shooting conditions.
Make Your Camera Accessible
This probably won’t appear to be a major ordeal, yet trust me when I state that the simpler it is for you to get your hands on your camera, the more photographs you will take, and the more photos you choose, the quicker you will improve as a picture taker.
The general purpose of a simple to use the camera is to have a little structure factor, so it’s anything but difficult to bear. In any case, even a little camera can disrupt the general flow if it’s dangling from your wrist throughout the day.
This holster is explicitly intended to suit to use of cameras. Fortunately, it likewise works with lightweight DSLRs, as well. That implies that as you update your camera framework, the Black Widow Holster can develop with you.
Final Words
In addition to the fact that this is a sheltered, secure approach to convey your camera that ensures against drops and burglary, yet with your camera on your hip in a Black Widow Holster.
It’ll move directly alongside your body, so you don’t feel like you have a firm, substantial camera adhered to your side.
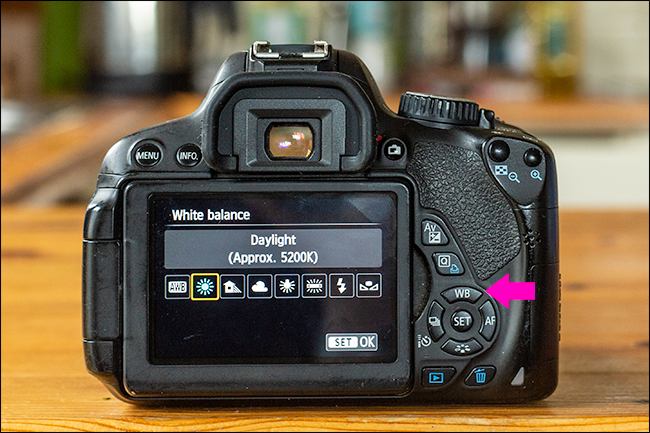
How do I know which camera setting to use?
- Check the exposure of your shot with the light meter displayed by your viewfinder.
- Choose an aperture.
- Adjust the shutter speed.
- Select the ISO setting.
- If the light meter “ticker” stands with 0, you have a “properly” exposed image.
- Take a shot
What are the 7 elements of photography?
The seven basic elements of photography: line, shape, form, texture, pattern, color, and space – all refer to the way you organize your image.
The combination helps you to represent one of these elements the way you choose.
Where do you focus on a group photo?
Group of pictures Avoids focusing on someone who is on the edge of the frame.
The fastest focus is on the focal points of the center. If you have a group of rows of two rows or less, place the focal point on someone’s face in the middle of the first row.
Which lens is better for group photos?
The best versatile lens for both portraits and large groups is 35mm.
This gives you the ability to capture a large group without the use of rows. You can also use lenses like 24mm or 24-70mm.
What type of photography is most in demand?
- Wildlife
- Fine Arts.
- Photojournalism and the street.
- Mono (black and white)
- Corporate Photography Corporate headshots, team shots, and artificial imagery can all help increase your income.
- Macro photography Get closer to your surroundings with macro photography.
What are the three basic settings of the camera?
To be able to capture great visuals, you need a little introduction to the camera’s three basic settings: Aperture, ISO, and Shutter Speed.
The combination of these three functions is present in most cameras and is essential for running your camera.

10+ Best Electric Pole Saws 2024 You Should Try One

10+ Best BMX Bike Tires 2024 Buyer’s Guide
7 Best Sleep Trackers 2024: Dream Better
About The Author
Mujeer
Mujeer is living in Pakistan. He has worked as a journalist for nearly a decade having manager authority on several large publications including Techs and the AmazeInvent. As a manager for AmazeInvent, he covers national and international developments.