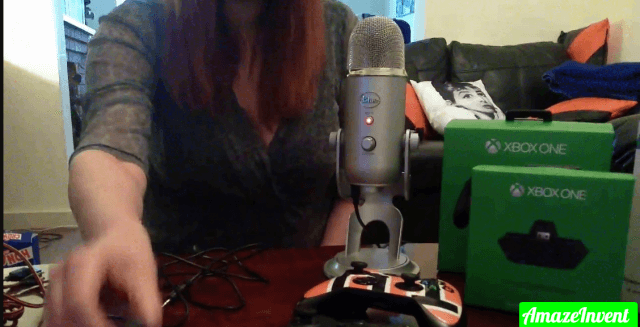
The Blue Yeti is a popular USB microphone that can be used for a variety of purposes, including streaming, podcasting, and gaming. While the Yeti is primarily designed for use with PCs, it can also be used with the Xbox One.
Here’s how to get started:
- First, connect the Yeti to your Xbox One using the included USB cable.
- Then open the Settings menu and go to the Devices & connections tab.
- Select Audio devices, then choose these from the list of input devices.
- You’ll now be able to use the Yeti as your Xbox One microphone.
One thing to keep in mind is that the Yeti will only work with games that support audio input from USB microphones. So if you’re having trouble getting the Yeti to work with a particular game, it’s likely that the game doesn’t support USB microphones. However, there are a few workarounds that may allow you to use the Yeti with unsupported games. For example, you can try connecting the Yeti to your PC and using software like Voicemeeter Banana to route the audio input from your PC to your Xbox One.
With a little bit of effort, you can use the Blue Yeti as your Xbox One microphone and enjoy better audio quality for all your gaming needs.
Are those uncomfortable and the mic doesn’t work well and not able to use Blue Yeti on Xbox One and PS5?
What is Blue Yeti?
Blue Yeti is a microphone, using which you can make recordings with your computer. The manufacturers of Blue Yeti have used tri-capsule technology, which produces studio-quality recordings.
There are four different settings, which provide the user with great flexibility.
They can record music, Twitch streaming, YouTube videos, and anything they want!
Consider a Cryptozoic lecture; it will require you to use multiple microphones. However, when you use Blue Yeti, you just need one microphone, because it gives you a studio-quality recording.
Patterns in Blue Yeti
There are four pattern modes in the Blue Yeti.
Cardioid Mode
This type of mode is perfect for Twitch streaming and music recording.
You can use this mode to do voice-overs as well.
- In this mode, the microphone records the voice that is directly in front of it, and this delivers a very rich sound to the listener.
Stereo Mode
In this mode, the user can use the left and right channels, to capture a wider sound image.
- This is best for recording acoustic guitar and for experiencing ARMS videos.
Unidirectional Mode
This mode picks sound quality from all around the microphone and is best if you want to give an impression of being in the place.
- For example, if you are recording a live band performance or a conference call, use this mode.
Bidirectional
These records from the front and the rear of the microphone. If you are taking someone’s interview, then use this mode as it will positively impact the sound quality.
Design of Blue Yeti
Blue Yeti comes with knobs, which lets you secure the microphone in place. The microphone is a great sound source and optimizes the sound quality as you have never heard before.
It is a portable microphone, as you can easily fold it and remove it from the base. If you want to mount the microphone, then you can do so on a mic stand or even a Radius II shockmount.
When you start recording using this microphone, make sure that you put it on the same side, near your mouth, as the Blue logo.
- This is a side-address microphone, and it accepts sound from an angle that is perpendicular to the mic. It doesn’t accept sound from the front-address.
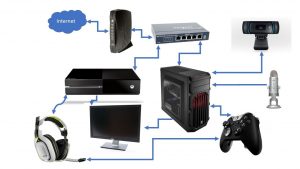
Using Blue Yeti for Xbox One
This high-quality microphone can give people an immersive experience, especially when they are playing games.
There are so many international gaming teams, that use Blue gaming microphones because it gives them a professional audio performance.
- If you get a Blue Yeti microphone, along with headphones, you get a competitive edge over another gamer.
- The reason why you would need Blue Yeti headphones is to hear the other side.
- The headphones can be easily connected with the microphone and Xbox One.
Connecting Blue Yeti on Xbox One
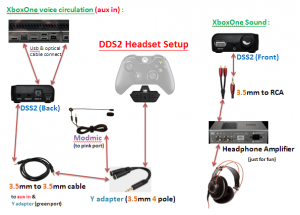
To connect the Blue Yeti with Xbox One, make sure you have a headset adapter for Xbox One.
- You take the adapter out of the box, and then connect it to the controller of Xbox One.
- Plugin the Blue Yeti to your Xbox One USB port, so its power is on.
- Next, you need a 3.5 4 pin cable, that you can get from any electronics shop.
- Plug the pin cable’s microphone end into the Xbox controller.
- Then, you need a flat audio cable, 3 feet.
- Plug the cable to the Blue Yeti, into the headphone jack.
- Then plug the other end of the same cable into the mic pin of the previous cable.
- This will connect the two devices.
In the second pin of the flat audio cable, you can plug in your headphones. Both devices are now connected.
- You can use the Yeti device to chat with other people when you are playing games.
- You can also use it for streaming to twitch, using Xbox One.
In case the Blue Yeti doesn’t work with the Xbox One controller, then you need to see if a driver is missing. However, most users didn’t find any problem connecting the two devices with the help of a USB and a cable.
Recording with Yeti
When you record a podcast or a YouTube video using Blue Yeti, then you should follow the steps given below:
- Connect the Yeti to the PC, with the USB cable given.
- Go to the Start menu.
- Open Control Panel.
- Select the sound icon from the control panel.
- Click on the Recording tab.
- Select Yeti.
- Click on Playback Tab.
- Select Yeti.
Yeti’s Headphone
Yeti’s headphones, which connect with the microphone, are easy-to-use blue yeti on Xbox one without an adapter. Users can control the volume of the headphone very easily, by turning the volume knob.
- The headphone jack of Yeti headphones is 3.5mm, and you can easily monitor your recording using these headphones.
- The unique thing about Yeti headphones is that they record in real tie, and you won’t feel any latency delays.
- The best way to use a blue yeti mic on Xbox one, is by putting it on a threaded mount, instead of the desk.
This way, you will be able to keep the Yeti in one place it won’t experience any ambient vibration or shock. Most users buy a Radius III shock mount with Yeti because it isolates the microphone from noise.
Don’t need Yeti?
If you think you don’t need Blue Yeti, think again! Yeti headphones and microphones are pretty helpful for gamers. They provide them with the immersive gaming experience that everyone wants.
Nowadays, most video games consist of more than one player. When players play with each other, they also communicate and give each other directions. With the help of Blue Yeti, players can make that experience and communication, more realistic.

Once you will buy Blue Yeti, your whole gaming experience is most likely to change. So, make things easier for yourself and try something new and unique.
How to use Blue Yeti on Xbox One without adapter?
Unfortunately, the Blue Yeti is not compatible with the Xbox One. You will need to purchase an adapter in order to use it with the console.
How to set up Blue Yeti on Xbox One?
There are a few ways that you can set up your Blue Yeti on Xbox One. You can either use the Xbox’s built-in audio mixer to control the levels of your microphone and game audio, or you can use third-party software to manage your audio settings.
Here are a few methods that you can try:
Method 1: Using the Xbox One’s Built-In Audio Mixer
- Launch the Settings app on your Xbox One.
- Select “All Settings.”
- Select “Sound & Screen.”
- Select “Audio Output.”
- Under “Output Device,” select your Blue Yeti microphone from the list of devices.
How does voice sound on Xbox One online using Blue Yeti?
The Blue Yeti is a popular USB microphone that is used for online gaming, voice over, and podcasting. It has 4 different pattern settings: cardioid, bidirectional, omnidirectional, and stereo.
For gaming or voice over work, the cardioid setting is recommended because it picks up sound from the front of the mic and rejects sound from the back. This is ideal for eliminating noise from your computer or other environmental distractions in your room.
For podcasting, the bidirectional setting may be a better option because it can capture sound from both sides of the mic. The omnidirectional setting can be used for general recording purposes, while the stereo setting will create a more wider soundstage.