Whenever your computer boots up, the very first thing that loads is the UEFI Firmware or the BIOS. This option actually does a lot of things which also consists of the option which your hardware use in order to boot the Windows.
There are many people who want to boot from a USB drive or any other external drive. If you are one of them then you should know that you will need to change the boot order on Windows 10.
The usual default boot order in Windows operating system is set to the first hard drive that is connected to the PC.
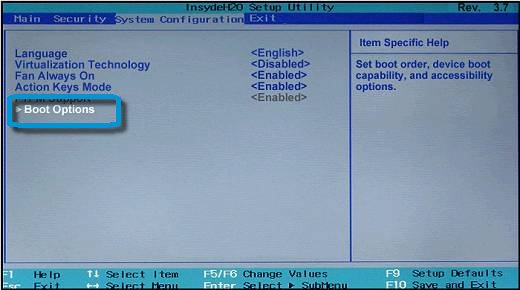
Before Windows 10, it was possible to do this simply by rebooting your PC only and then pressing a unique key like F2 or DEL on your keyboard in order to get into the BIOS.
In this latest version of Windows i.e. Windows 10, Microsoft has integrated a recovery system that allows the user to do a lot of things. One of those options is to boot into BIOS making it much easier just in case you miss pressing the key as most of the people do.
Read more: How To Disable Microsoft Family Features?
There are times when after installing or upgrading your operating system you might want to change the boot order, right? I have good news for you that in Windows 10 you won’t have the need for any third-party tool to do so.
Let me share some ways with you through which you can change the boot order in Windows 10.
How to Change the boot order via System Configuration?
- Open the Start/taskbar search field, type MSConfig, and then press Enter to open the System Configuration dialog.
- Switch to Boot tab. Click on the operating system to select it in order to set it as default and then click on the “Set as default” button.
- Click on the “Apply” button.
Read more: How to Delete Win Log Files in Windows 10?
How to Change the boot order via advanced options?
- Close all the programs that are running on your computer and restart it.
- When you see the boot menu screen that allows you to choose an operating system to work with, click on the option that says “Change defaults or choose others“.
- You will be redirected to the Options screen. You have to click on “Choose a default operating system” tile.
- Now on this page, you will be able to see your default operating system. The operating system that is listed on the top is usually the default operating system.
In order to change the default operating system, just click on the tile of the Windows operating system that you want to set as the default operating system for you.
Read more: How to Join an Xbox Party on PC?
Another way to change the boot order in Win 10
- Open the Settings application, search and locate Update $ security option and then go to Recovery option.
- In the Advanced startup section, click on the button that says “Restart now“.
- After you PC restarts, you will get the “Choose an option” screen. Click on the “Use another operating system” tile.
- Then click on the “Change defaults” option.
- You will see another screen now, click on the tile that says “Choose a default operating system”.
- Lastly, click on the operating system that you want to set as default and you’re done.
Click on the Back icon on the Options screen and then see and click on the new default operating system that you set.