
Stop Spybot from opening automatically? Spybot Search and Destroy can also protect the computers in a home office, small or large office from malware as such spyware.
When it is installed the malware removal tool will usually open automatically and it runs scans if the automatic startup feature has been enabled.
What is SpyBot?
So many years ago, when the concept of spyware was brand new, securing against the attacks such as toolbars that stole personal data was considered a different task than just antivirus protection.
In those past days, Spybot – Search & Destroy ruled the spyware protection field.
Modern antivirus programs handle a large variety of malware, which includes viruses, Trojans, ransomware, and also even spyware. Spybot does not replace your antivirus, but it rather runs alongside it in partnership.
By disabling the automatic startup feature is a customization preference which can also be used if you can prefer to run scans on business computers only when you need to.
How To Stop Spybot From Opening Automatically Windows 10?
By disabling it also lowers the number of programs that are running at startup, which can also improve a computer’s startup speed.
Step 1:
- First of all, Open Spybot Search & Destroy, then click on Mode and then select Advanced Mode.
- After this, select Tools and then go to System Startup.
Step 2:
- Click on the Start button and then click on Computer to launch Windows Explorer.
Step 3:
- Double-click on the C drive and then double-click on the Program Files folder.
- Then double-click on the Spybot Search and Destroy folder, and then select the SpybotSD.exe folder. Then from there, delete the ‘auto-check’ file.
Step 4:
- Reboot SpyBot Search and Destroy if it continues to open automatically.
- If that still does not solve the issue, then download the latest version of Spybot and the advcheck.dll file from the Safer-Networking site.
Step 5:
- Open the Program Files folder again, and then open the Spybot folder for its new installation.
- Look for the SpybotSD.exe and advcheck.dll files and then drag them to the old Spybot folder in the Program Files folder.
- When prompted, confirm to replace the old spybotSD.exe and advcheck.dll files.
Starting with Spybot
On the home page of Spybot’s site, you will find Professional, Home, Corporate, and Technician editions of the commercial Spybot, but not the free version. While on the product page, the free edition emerges, but with a Donate button where the others have prices.
- During its installation, you have to make a clear choice of “I want to be protected without having to attend to it myself” or “I want more control, more feedback, and more responsibility.” The former one is the default. But if you want more control, you can choose the latter.
- By default, Spybot checks for updated malware signatures at the first launch.
That is important because out of the box the product does not have any of the signatures. Updating it is a manual affair unless you spring for a paid edition.
You can in fact set an update task by using the very awkward Windows Task Scheduler, as you can with the Microsoft Windows Defender Security Center, but I do not think that many of the users will do.
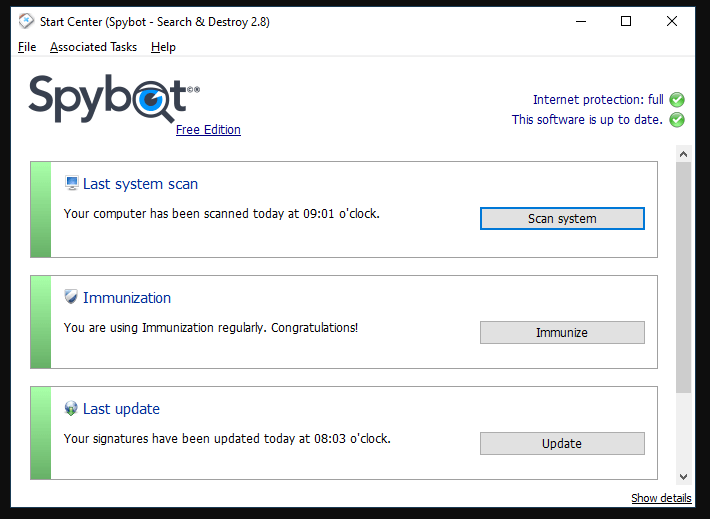
When you have finished with that quick signature update, you can see the Start Center, Spybot’s main window. Three buttons let you launch a scan, check for updates, or do something which is called Immunization.
As it is noted, Spybot reserves automatic updates for the paying users. Do not forget to update manually before every time you run a scan. A full scan of a standard clean test system took about 23 minutes.
Read more: How to connect a laptop on a TV via HDMI?